
I still remember the day I transformed my tired vegetable garden border with a simple wheelbarrow load of river rocks. The difference was stunning, and I’ve been hooked on using rocks strategically in my gardens ever since.
Rocks have become one of the hottest garden design elements in 2026, and for good reason. They’re practical problem-solvers that tackle drainage issues, suppress weeds, and protect plant roots from temperature extremes. But beyond function, they bring texture, structure, and year-round visual interest that plants alone can’t provide. Whether you’re dealing with a soggy corner, creating a low-maintenance rock garden, or just want to add some polish to your landscape, rocks offer solutions that last for decades without the annual refresh that mulch demands.
The beauty of gardening with rocks is that there’s no single right way to do it. I’ve seen community members use pea gravel to create stunning pathways between raised beds, line ponds with smooth river stones that look like they’ve always been there, and build striking focal points with stacked boulders. Others swear by crushed granite for their succulent gardens or use lava rock to add a pop of color while improving soil aeration.
What makes rocks particularly appealing right now is the shift toward sustainable, water-wise gardening. Unlike organic mulches that decompose and need replacing, rocks stay put and actually help conserve moisture in the soil beneath them. They’re an investment that pays off year after year.
In this guide, I’ll walk you through the most popular rock types for different garden applications, share creative ways to use them that I’ve picked up from years of experimentation and conversations with fellow gardeners, and give you the practical details on sourcing and pricing so you can plan your project with confidence.
What Makes Rocks Essential for Modern Gardens
Rocks have moved beyond decorative afterthoughts to become problem-solving powerhouses in 2026 gardens. I first realized their potential three years ago when a soggy corner of my yard refused to grow anything except mosquitoes. A layer of river rocks transformed that dead zone into a charming dry creek bed that actually handles runoff beautifully.
The practical benefits explain why gardeners are reaching for rocks more than ever. Clay-heavy or compacted soils plague many yards, and rocks improve drainage naturally by creating air pockets that let water flow through instead of pooling on the surface. This simple fix prevents root rot and makes previously unusable garden areas productive again.
Weeds represent another universal gardening headache that rocks address elegantly. When you spread a three-inch layer of stone over landscape fabric, gravel suppresses weeds by blocking sunlight while allowing water to reach plant roots. This approach cuts down on lawn maintenance hours dramatically compared to traditional mulch that decomposes and needs constant replenishment.
Water conservation has pushed rocks into the spotlight as drought concerns grow across regions. Unlike organic mulches that absorb moisture, stone reflects heat while still moderating soil temperature swings. Your plants get consistent conditions, and you water less frequently because evaporation drops. For xeriscaping or water-wise gardens, rocks form the visual backbone that ties native plants together.
The aesthetic angle matters too. Clean white limestone creates striking contrast against dark foliage, while earth-toned river stones blend seamlessly into naturalistic designs. Rocks give gardens structure and definition year-round, looking just as polished in January as they do in July. That permanence appeals to gardeners tired of seasonal upkeep cycles that never seem to end.
Types of Gardening Rocks and Their Best Uses
Decorative Limestone: The Popular Choice
White decorative limestone has become the darling of garden makeovers this year, and I completely understand why. These bright, clean stones create an instant sense of polish that transforms even the most basic garden bed into something special. I first used white limestone around my herb garden last spring, and the contrast against dark green foliage made those plants absolutely pop.
What makes limestone particularly versatile is how it adapts to different garden styles. The same white rocks that give a modern minimalist garden its crisp edges work equally well softening the look of a cottage garden or brightening a shaded pathway. You’ll typically find these stones available in 15 kg quantities, making them manageable for weekend projects without requiring heavy equipment.
The pricing structure makes experimentation accessible too. While individual bags run around ten to fifteen dollars, many suppliers offer bulk discounts that bring costs down significantly when you’re tackling larger areas. Keep in mind that delivery fees usually fall to the buyer, so it’s worth calculating whether picking up locally makes more sense for your project size and budget.
Natural River Rocks and Smooth Stones
There’s something inherently calming about river rocks. I remember placing a handful around a small water feature in my yard and immediately feeling the space shift from functional to soothing. These smooth, rounded stones come in earthy tones ranging from warm grays and tans to deep charcoals and rust, creating that organic look many of us crave in 2026’s more natural garden designs.
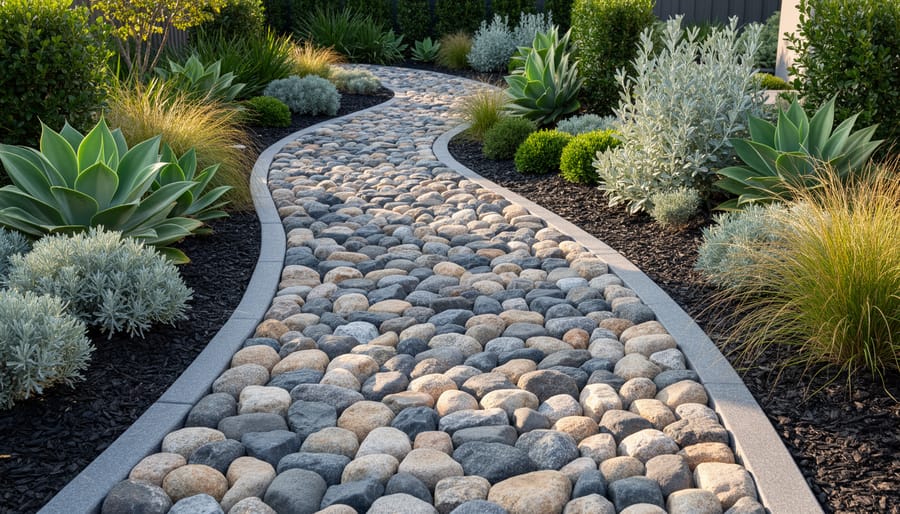
River rocks excel in areas where you want visual softness paired with durability. I’ve used them to line dry creek beds that channel rainwater during storms, and they look convincing even when dry. Around ponds or fountains, they bridge the transition between water and planted areas beautifully without the sharp edges that can feel jarring. For pathways, larger river rocks provide stable footing while smaller ones nestle between stepping stones to prevent weeds and mud.
The sizing matters here. Fist-sized specimens work well as focal features or borders, while smaller smooth pebbles create gentle textures underfoot. One tip: wet river rocks before making your final selection if possible. Their colors deepen dramatically when damp, showing you what they’ll truly look like after rain or near water features.
Functional Options: Lava Rock and Gravel
When you need rocks that work as hard as they look, lava rock and gravel are your reliable workhorses. I’ve used both extensively in my own garden, and they’ve solved problems that prettier stones simply couldn’t handle.
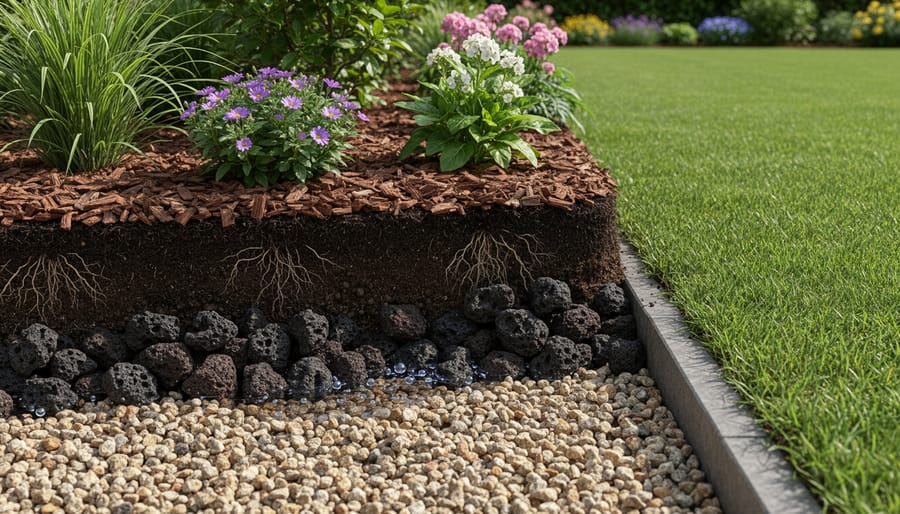
Lava rock excels at drainage because its porous structure absorbs and releases water gradually, making it perfect for container gardens and areas prone to waterlogging. I layer it at the bottom of large planters to prevent root rot, and it’s surprisingly lightweight compared to other rock options, which your back will appreciate during installation. The reddish-brown color adds a natural, earthy contrast to green foliage.
Gravel comes in various sizes, from fine pea gravel to larger crushed stone, and it’s the most practical choice for pathways and driveways. It compacts underfoot to create stable walking surfaces while still allowing water to permeate. I’ve found that a two to three inch layer over landscape fabric prevents weeds effectively without the maintenance headaches of mulch. The crunching sound underfoot also provides a subtle security benefit, alerting you when someone’s approaching.
Both materials are typically more affordable than decorative rocks and available in bulk, making them budget-friendly for larger projects where function trumps aesthetics.
Creative Ways to Use Rocks in Your Garden
I still remember the weekend I transformed my plain side yard by lining it with smooth river rocks around a simple fire pit. The project took just an afternoon, but it completely changed how I used that space. That same versatility is what makes rocks such a fantastic medium for garden creativity.
Here are some projects to spark your imagination, starting with the simplest approaches:
- Create rock borders around existing beds. Simply line your flower or vegetable beds with medium-sized stones to define edges and prevent grass encroachment. This takes about an hour for a standard bed and instantly adds polish.
- Replace mulch in problem areas. Swap traditional wood mulch for decorative rocks in spots where mulch constantly washes away or decomposes too quickly. The rocks stay put through storms and never need replenishing.
- Build a dry creek bed for drainage. Arrange river rocks in a meandering pattern through areas where water pools after rain. This solves drainage issues while creating an attractive landscape feature that looks intentional even when dry.
- Design a rock pathway with stepping stones. Set larger flat rocks as stepping stones through your lawn or garden, then fill gaps with pea gravel. This project requires some ground preparation but creates a charming, low-maintenance walkway.
- Construct a tiered rock garden on a slope. Stack rocks to create terraced planting pockets on hillsides, filling each level with soil for drought-tolerant plants. This more advanced project addresses erosion while adding dramatic vertical interest.
My favorite application has been using white limestone rocks as a bright accent around dark foliage plants. The contrast really makes both elements pop, and the rocks reflect light beautifully in evening hours.
For water-wise landscaping, rocks are unbeatable. They keep soil cool and moist underneath while eliminating the need for frequent watering that grass or bare soil demands. I have used lava rock around my established shrubs, which reduced my watering by half during summer months.
When planning a garden around a barbecue or outdoor cooking area, rocks serve double duty as both fire-safe ground cover and an attractive gathering space. They do not catch sparks, they stay cooler underfoot than pavement, and they create a natural transition between your cooking zone and planted areas.
If you are incorporating water features, rocks integrate beautifully with water irrigation pumps and fountain systems. Stack them around the water source to hide mechanical elements while creating a natural-looking cascade.
Start with whichever project fits your current garden needs. Even a simple border takes your space up a notch, and you can always expand from there once you see how well rocks perform.
Getting Started: How Much Do You Need and What Will It Cost?
The first question most gardeners ask when planning a rock project is simple: how much do I actually need? I learned this the hard way after buying three bags of river rocks for a pathway, only to realize halfway through that I’d need six more. Let me help you avoid that rookie mistake.
Start by measuring your project area in square feet (length times width). For most decorative rock applications, you’ll want a depth of 2-3 inches. As a general rule, a 15 kg bag covers roughly 4-6 square feet at this depth, depending on rock size. Smaller pea gravel spreads further than chunky limestone. For a simple garden border that’s 10 feet long and 2 feet wide, you’re looking at about 4-5 bags to get decent coverage without bare spots showing through.
Pricing varies widely based on rock type and whether you’re buying small bags or ordering in bulk. I’ve seen decorative limestone rocks sold in 15 kg bags for around $15, which is pretty typical for smaller quantities. Some sellers offer bulk discounts that make a real difference if you’re tackling a bigger project: one bag for $10, three bags for $25, or five bags at an even better rate. The math works out to significant savings when you’re covering a large area.
Here’s something that catches people off guard: delivery costs. Many suppliers charge separately for transport, and given how heavy rocks are, that fee can add up quickly. If you’re ordering just a couple of bags, picking them up yourself saves money. But for bulk orders, paying for delivery beats making multiple trips in your car (trust me, your suspension will thank you).
My advice? Calculate what you think you need, then add 10-15% extra. Having a few leftover bags beats running short and discovering the next batch doesn’t quite match.
Where to Source Quality Gardening Rocks in 2026
Finding quality gardening rocks has become remarkably convenient in 2026, with options ranging from traditional retail to digital marketplaces. Your best approach depends on your project size, budget, and how hands-on you want to be in the selection process.
Local garden centers and nurseries remain excellent starting points, especially if you’re new to rock gardening. You can see the actual colors and textures before committing, and staff can offer advice on coverage rates and compatibility with your soil. Landscape supply yards typically stock bulk quantities at better prices than retail, though they may have minimum order requirements.
Online marketplaces have transformed rock sourcing this year. Platforms like Carousell now feature extensive gardening rock listings where you can compare options by size, color, and price. I’ve found these particularly useful for tracking down specific rock types without driving all over town. However, delivery costs matter, many sellers price rocks attractively but expect buyers to arrange and cover transport, which can add significantly to your final expense.
Community exchanges and neighborhood groups offer surprising treasures. Gardeners frequently rehome excess rocks from completed projects, sometimes free for pickup. Local gardening forums and social media groups often feature these opportunities, and you might connect with fellow enthusiasts willing to share sourcing tips specific to your area.
When evaluating any source, examine the rocks closely if possible. Look for consistent sizing within each batch, check for excessive dust or debris, and confirm the quantity matches what you need. Ask about return policies for online purchases, and clarify whether delivery includes placement or just curbside drop-off. The right supplier makes your project smoother from the start.
Installation Tips That Save Time and Effort
I’ll never forget the weekend I spent rearranging 300 pounds of river rock because I skipped the landscape fabric. Learn from my mistakes and you’ll save yourself hours of frustration.
Start by clearing the area of all vegetation and debris, digging down about three to four inches for most rock applications. This depth gives you room for proper layering without creating a trip hazard. Level the soil with a rake, and if you’re working in a climate zone different from your original USDA gardening zones check whether your soil drains well or tends to hold water, as this affects how deep your rock layer should be.
Lay landscape fabric over the prepared soil, overlapping seams by at least six inches to prevent gaps where weeds can emerge. Secure it with landscape staples every few feet. For pathways that will see foot traffic, use commercial-grade fabric rated for heavy use rather than the thin, budget options that tear easily.
When placing rocks, start from the edges and work inward, maintaining a depth of two to three inches for smaller gravel and three to four inches for larger decorative stones. This coverage prevents the fabric from showing through while keeping the layer manageable. Pour rocks in sections rather than dumping the entire load at once, which makes spreading easier and reduces back strain.
For families with young children, keep garden safety tips in mind by choosing smooth, rounded rocks rather than sharp-edged crushed stone for play areas. Rake the surface level once rocks are in place, and water lightly to help them settle into their final positions.
Edge your rock areas with metal or plastic garden edging to keep stones from migrating into lawn areas. Check the installation every few months during the first year, adding rocks to any low spots that develop as the ground settles.
Community Ideas: What Fellow Gardeners Are Creating
The best rock garden inspiration often comes from fellow gardeners who’ve already experimented and problem-solved. I’ve noticed more gardeners sharing their projects on community forums and social media this year, and the creativity is honestly inspiring.
One trend I’m seeing repeatedly is layered rock borders combined with drought-tolerant succulents. Several community members have posted photos of their tiered gardens using different-sized stones to create depth and visual interest. Another popular project involves using white decorative rocks as a clean backdrop for colorful container gardens, which creates a striking modern look without permanent commitment.
Local garden talks and workshops have become valuable spaces for exchanging rock gardening techniques. These gatherings let experienced gardeners demonstrate installation methods while beginners ask practical questions about coverage rates, color combinations, and maintenance shortcuts. The informal knowledge-sharing that happens over coffee after these sessions often proves just as useful as the formal presentation.
I’d love to hear what you’re working on. Have you tried mixing rock types in a single project? Found a creative solution for sloped areas? Discovered an unexpected benefit from switching to rock mulch? Drop your experiences in the comments or share photos of your garden transformations. Your trial-and-error lessons might be exactly what another gardener needs to hear before starting their own project. We learn fastest when we share what actually worked versus what looked good only in theory.
Whether you’re dreaming of a serene rock garden or just want to tackle that muddy patch by the gate, rocks offer a solution that’s both beautiful and practical. I’ve seen firsthand how a single afternoon project with pea gravel or river rocks can completely transform a problem area into something you’re proud to show off.
The best part? You don’t need to redesign your entire garden to see results. Start with one small project that addresses a specific challenge you’re facing. Edge a flower bed with limestone, create a simple pathway with smooth river stones, or use lava rock to improve drainage around your favorite plants. These bite-sized projects build confidence and let you experiment without overwhelming your budget or schedule.
I’d love to hear what you decide to tackle first. Share your rock garden projects with our Plant Geek community, ask questions, and swap ideas with fellow gardeners who are discovering just how versatile rocks can be. Every garden tells a story, and I can’t wait to see what yours will look like with a few well-placed stones. Happy gardening, and here’s to creating outdoor spaces that bring you joy every single day.