
I planted my first herb garden on a cramped apartment balcony in 2019, squeezing basil and mint into mismatched pots I’d grabbed from a clearance sale. That summer taught me something crucial: growing herbs isn’t about having the perfect setup or encyclopedic knowledge. It’s about showing up with a bit of curiosity and being willing to learn as you go.
If you’re standing at the garden center right now, overwhelmed by seed packets and soil options, take a breath. Herb gardening for beginners doesn’t require a green thumb or years of experience. What you need is a clear starting point and the confidence to get your hands dirty.
Here’s what I wish someone had told me on day one: herbs are remarkably forgiving plants. They actually want to grow. Your job isn’t to perform horticultural magic but to provide some basic conditions and pay attention to what your plants are telling you. That wilting basil? It’s thirsty. Those yellowing mint leaves? Probably getting too much water. The plants communicate if you’re willing to listen.
The herb gardening movement has exploded in 2026, with community workshops popping up everywhere from local libraries to neighborhood gardens. I’ve watched complete beginners walk into these sessions nervous and leave three hours later with dirt under their nails and genuine excitement about their new parsley starts. There’s something powerful about learning alongside others who are equally clueless about the difference between cilantro and culantro.
This guide will walk you through everything you need to start growing herbs today. Not someday when you have more time or a bigger yard or better weather. Today. You’ll learn which herbs tolerate beginner mistakes, what supplies actually matter, and how to avoid the common pitfalls that trip up new gardeners. Let’s get started.
Why Herb Gardening Is Perfect for Beginning Gardeners
Herbs are the gateway drug to gardening, and I mean that in the best possible way. Last spring, I watched my neighbor transform from someone who “killed every plant” into a confident gardener, all because she started with a pot of basil on her fire escape. That’s the magic of herbs.
Unlike finicky flowers or demanding vegetables, herbs actually want to grow. Most germinate within a week, sometimes days, giving you that crucial early win when you’re still wondering if you have a green thumb. Basil pushes through soil in five days flat. Cilantro appears almost overnight. That quick feedback loop keeps beginners engaged instead of anxiously staring at dirt for weeks.
Herbs also forgive your mistakes. Forget to water for a day? Rosemary shrugs it off. Snip a stem in the wrong spot? Mint multiplies anyway. This resilience gives new gardeners room to learn without the heartbreak of watching prized plants wither from beginner errors.
The payoff is immediate and delicious. You’re not waiting months for a tomato to ripen. Scissors, thirty seconds, fresh basil on your pasta tonight. That direct connection between garden and dinner plate creates genuine excitement. You’ll find yourself cooking differently, planning meals around what’s thriving outside your door.
Space and budget concerns disappear with herbs. A sunny windowsill holds three pots. A small balcony becomes a full herb garden. Six starter plants cost less than two fancy coffee drinks, and many herbs regrow from cuttings, making your initial investment practically infinite.
Most importantly, herbs build the fundamental skills every gardener needs: reading your plants, understanding water needs, recognizing healthy growth, timing harvests. You’re learning the same principles that apply to roses or vegetables, but with plants that actually cooperate while you figure things out. By the time you’ve kept basil happy for a month, you’ve earned real gardening confidence.
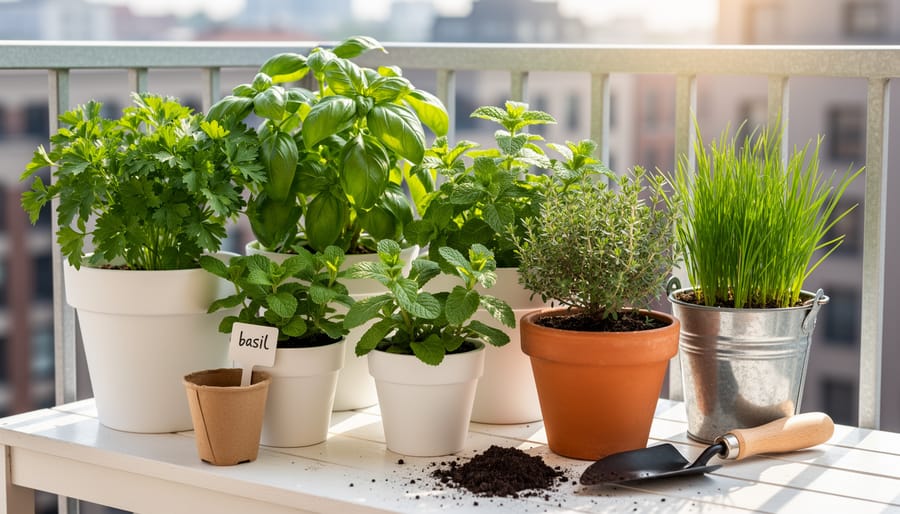
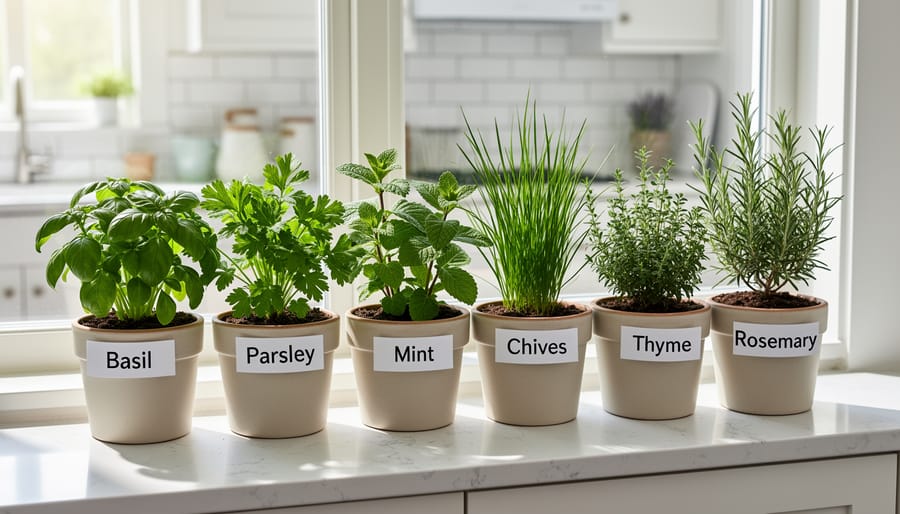
Choosing Your First Herbs: The Starter Six
Understanding Sun and Shade Requirements
When I started my herb garden, I spent way too long trying to figure out what “full sun” actually meant for my north-facing balcony. Here’s the simple truth: full sun means six or more hours of direct sunlight hitting your plants each day. You can literally watch where the sun moves across your space on a Saturday and count the hours.
Partial shade gets three to six hours of direct sun, usually morning light or dappled afternoon sun. If you have a spot that’s bright but gets blocked by a building or tree for part of the day, that’s your partial shade zone.
Full shade means fewer than three hours of direct sun. Most herbs struggle here, but parsley and mint can manage if the area stays bright otherwise.
For apartment dwellers, south-facing windows or balconies give you full sun. East-facing spots usually provide partial shade with gentle morning light. West-facing areas can work but watch for scorching afternoon heat in summer. Count actual sun hours on your specific growing spot rather than guessing, because buildings and trees create surprisingly different conditions just a few feet apart.
Container vs. Ground Growing
If you’re in an apartment or have limited outdoor space, container gardening lets you grow herbs on patios, balconies, or sunny windowsills without needing a yard. I started with three pots on my fire escape, and within weeks I was clipping fresh basil for dinner. Containers offer control over soil quality, easy pest management, and the flexibility to move plants to follow the sun or bring them indoors during cold snaps. Just make sure your containers need drainage holes to prevent waterlogged roots.
Ground planting works beautifully if you have garden space and want a more permanent setup. Herbs planted directly in beds develop deeper root systems, require less frequent watering once established, and often grow larger than their potted cousins. The downside is that you can’t easily protect them from unexpected weather or relocate them if conditions change. For absolute beginners, I recommend starting with containers for your first season. They’re more forgiving, and you can always expand into garden beds once you’ve built confidence with a few successful harvests.
Essential Supplies You Actually Need (And What You Don’t)
When you’re starting your herb gardening journey, the sheer volume of products marketed to beginners can feel overwhelming. Here’s the truth: you need far less than the garden centers want you to believe, and spending more doesn’t guarantee better results.
The absolute necessities are simple. You need containers with drainage holes if you’re not planting in the ground, any pot, bucket, or even repurposed food containers work fine as long as water can escape. Quality potting mix designed for containers is non-negotiable, though, since regular garden soil compacts and drowns roots in pots. A basic watering can or even a recycled milk jug with holes poked in the cap will handle your watering needs perfectly.
That’s genuinely it for starting out. I began my first herb garden with terracotta pots from a clearance sale and a bag of organic potting mix, and those plants thrived.
Now for what you don’t actually need right away: specialized herb fertilizers, moisture meters, fancy self-watering systems, or dedicated herb planters with individual compartments. These might enhance your experience later, but they’re not required for success and can wait until you’ve grown your first few harvests. When you’re ready to buy the right tools for expanding your garden, you’ll know from experience what would genuinely help versus what’s just marketing.
A simple pair of kitchen scissors handles all your harvesting and trimming needs. Skip the “herb snips” unless you already own them.
For fertilizer, wait until you’ve been growing for a month. A standard balanced liquid fertilizer diluted to half strength works beautifully for all six starter herbs. You’ll use it maybe once every two weeks during active growth.
Labels are helpful if you’re planting multiple varieties, but painter’s tape and a marker cost pennies compared to decorative plant markers. Most beginners can easily remember what they planted in their first six pots anyway.
The best investment isn’t in gadgets, it’s in decent potting mix and healthy starter plants. Everything else you likely already have at home or can improvise until you discover what actually makes your gardening life easier through real experience.
Planting Your First Herbs: Step-by-Step
Seeds vs. Starter Plants: Which Route to Take
When you’re standing in the garden center aisle deciding between a packet of seeds and a four-inch pot of established basil, here’s what I wish someone had told me on day one: both paths work, but they deliver different experiences.
Starter plants give you instant gratification and nearly guaranteed success. You’ll harvest within days, not weeks, which matters when you’re still building confidence. For your first garden, I’d grab transplants of basil, rosemary, and thyme. Basil especially rockets ahead from a starter plant, and you’ll be tossing fresh leaves into pasta by the following weekend. Rosemary and thyme grow slowly from seed anyway, so buying starts saves you months of waiting.
Seeds make sense for herbs that either resent transplanting or cost a fortune as starts. Cilantro, dill, and parsley actually prefer being sown directly where they’ll grow, their taproots undisturbed. A seed packet of cilantro costs three dollars and gives you dozens of plants versus six dollars for one scraggly transplant that might bolt within two weeks.
Here’s my hybrid approach for beginners: buy three or four starter plants of your absolute favorites, then experiment with one or two seed packets of fast growers like cilantro or chives. You’ll enjoy immediate harvests from the transplants while watching seeds germinate teaches you what healthy seedlings look like. Best of both worlds, and you’re not betting your entire first garden on successfully nursing seeds.
Daily and Weekly Care Routines
Here’s the thing about herb care that takes new gardeners a while to realize: your plants will tell you what they need if you just pay attention. I spent my first month obsessively following a watering schedule I’d found online, completely ignoring the fact that my mint was drowning while my rosemary was parched. Both were getting the same treatment because some chart said so.
Start with a simple daily check instead of a rigid routine. Each morning (or evening, whatever fits your schedule), spend two minutes looking at your herbs. Are the leaves perky or drooping? Is the soil pulling away from container edges? Stick your finger an inch into the soil. If it feels dry, water thoroughly until it drains from the bottom. If it’s still moist, leave it alone.
Most herbs need watering every two to three days in containers, less frequently in the ground, but this varies wildly based on your climate, pot size, and sun exposure. A basil plant in a small terracotta pot on a sunny balcony might need daily watering in summer, while that same plant in a larger ceramic pot with better moisture retention could go three days. This is why observation beats any watering irrigation schedule you’ll find online.
Weekly, check for pests by turning over a few leaves on each plant. Look for tiny holes, sticky residue, or actual bugs. Catching aphids or spider mites early means you can just spray them off with water instead of dealing with a full infestation later.
Hold off on fertilizer for the first month after planting. After that, a light feeding every three to four weeks during the growing season keeps herbs productive without making them leggy. I use half the recommended strength because herbs grown for flavor actually taste better when they’re not overfed.
The real skill you’re building here is not following rules. It’s learning to read your plants, noticing patterns in your specific conditions, and trusting your observations. That intuition develops faster than you’d think.
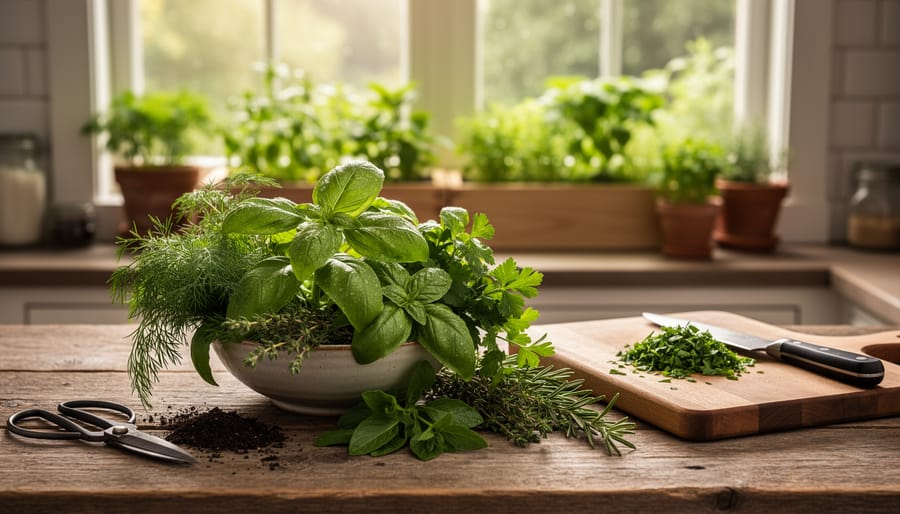
Harvesting and Using Your Herbs
Preserving Your Harvest
When your herbs flourish beyond what you can use fresh, you’ve hit that wonderful milestone every beginner dreams of: actual abundance. I still remember my first summer with basil, when I went from worrying it wouldn’t grow to frantically searching for preservation methods while staring at armfuls of fragrant leaves.
The simplest method is air-drying, perfect for rosemary, thyme, and oregano. Bundle four to six stems with kitchen twine, hang them upside down in a warm, dry spot away from direct sunlight, and wait one to two weeks until the leaves crumble easily. Strip the dried leaves into airtight jars and label them with the date.
Freezing works beautifully for basil, parsley, and cilantro, which lose flavor when air-dried. Chop the herbs roughly, pack them into ice cube trays, cover with olive oil or water, and freeze. Pop out a cube whenever a recipe calls for fresh herbs.
For quick microwave drying, place washed, dry herb sprigs between paper towels and microwave in 30-second bursts until crisp. This takes just two to three minutes for most herbs and preserves color remarkably well.
Store everything in a cool, dark cupboard. Properly dried herbs maintain good flavor for six months, frozen herb cubes last about four months, and you’ll feel brilliantly resourceful using your own preserved harvest all winter long.
Troubleshooting Common Beginner Problems
Every herb gardener has watched a plant struggle and wondered what went wrong. The good news? Most problems are fixable, and each one teaches you something valuable about your plants’ needs.
Yellowing leaves usually signal a watering issue. If the soil feels soggy, you’re overdoing it and roots can’t breathe. Let the top inch dry out before watering again. If the soil is bone-dry and leaves are crispy, your herbs are thirsty. Adjust your schedule and they’ll bounce back within days.
Leggy, stretched-out growth means your herbs are reaching desperately for light. Move them closer to a window or add a grow light. Pinch back those long stems to encourage bushier growth, and they’ll fill out nicely. This happens even in spaces with what seems like plenty of light, especially with basil.
- Wilting despite moist soil
- Usually indicates root problems from overwatering or poor drainage. Check that your container has drainage holes and reduce watering frequency.
- Brown, crispy leaf edges
- Often caused by inconsistent watering or low humidity. Water more regularly and consider misting Mediterranean herbs like rosemary occasionally.
- Tiny bugs on stems or leaves
- Aphids or spider mites love tender new growth. Spray them off with water or use insecticidal soap, repeating every few days until they’re gone.
- White powdery coating on leaves
- Powdery mildew from poor air circulation or humidity. Improve airflow, remove affected leaves, and avoid watering in the evening.
Remember, different herbs have different needs based on their native climates and your specific USDA gardening zones. A mint that thrives with constant moisture will suffer from the same treatment that makes rosemary happy.
I’ve killed more herbs than I care to admit while learning these lessons. The difference between a beginner and an experienced gardener isn’t avoiding problems altogether. It’s recognizing them early and knowing exactly what to adjust.
Joining the Herb Gardening Community in 2026
You’re not alone in this journey. One of the most exciting shifts in 2026 is how many people are discovering herb gardening together, through hands-on workshops and classes designed specifically for beginners. Spring 2026 has seen a surge of these programs, like the ‘Herb Gardening 101’ workshops running February through April (which filled up quickly) and the ‘Pot-Along-Herb Herb Gardening Class for Beginners’ scheduled for May 22nd. These sessions offer simple tips and techniques in a supportive environment where you can ask questions, get your hands dirty alongside others, and leave with actual plants you’ve potted yourself.
Check community centers, local nurseries, and botanical gardens in your area for similar beginner-focused events. Many are happening on weekday evenings or weekend afternoons to accommodate working schedules. The format usually includes practical demonstrations rather than lectures, which means you’ll learn by doing rather than just listening.
Beyond in-person workshops, online communities have become incredible resources for new herb gardeners. Facebook groups, Reddit’s gardening communities, and Instagram hashtags connect you with experienced growers who remember their own first attempts and genuinely want to help. Here at Plant Geek, our community forum is full of gardeners at every level sharing photos of their harvests, asking questions about yellowing basil leaves, and celebrating their first successful propagations.
When you’re starting out, having people to turn to makes all the difference. Someone who can confirm that yes, your mint is supposed to grow that aggressively, or reassure you that leggy seedlings aren’t a failure but a learning opportunity. If you’re gardening with children, connecting with other parent-gardeners for garden safety tips adds another valuable layer to your community network. Don’t hesitate to share your progress, ask seemingly basic questions, and learn from others who started exactly where you are now.
You’ve already got everything you need to start your herb gardening journey this weekend. The gap between where you are now and your first fragrant basil harvest isn’t nearly as wide as it might seem. I’ve watched hundreds of people walk into workshops convinced they’ll kill every plant they touch, then message me three months later with photos of thriving herb gardens and detailed questions about expanding to vegetables. That transformation never gets old.
The beauty of beginning with herbs is that they’re genuinely forgiving teachers. Your first basil plant might get a bit leggy. Your mint will probably try to take over. You’ll forget to water the rosemary, then panic and overwater it. These aren’t failures; they’re how you develop gardening instincts that no article can fully teach. Every yellowed leaf and successful harvest builds the confidence to try something new.
Start small this weekend. Pick two or three herbs from the starter six, grab some pots and soil, and get your hands dirty. You don’t need perfect conditions or expert knowledge. You just need curiosity and the willingness to learn as you go.
I’d love to hear how your first planting goes. Share your wins, your questions, and yes, even your wilted basil photos in the comments below. The Plant Geek community thrives on exactly these exchanges, and someone else wondering whether their parsley looks normal will benefit from your experience. We’re all figuring this out together, one herb at a time.