
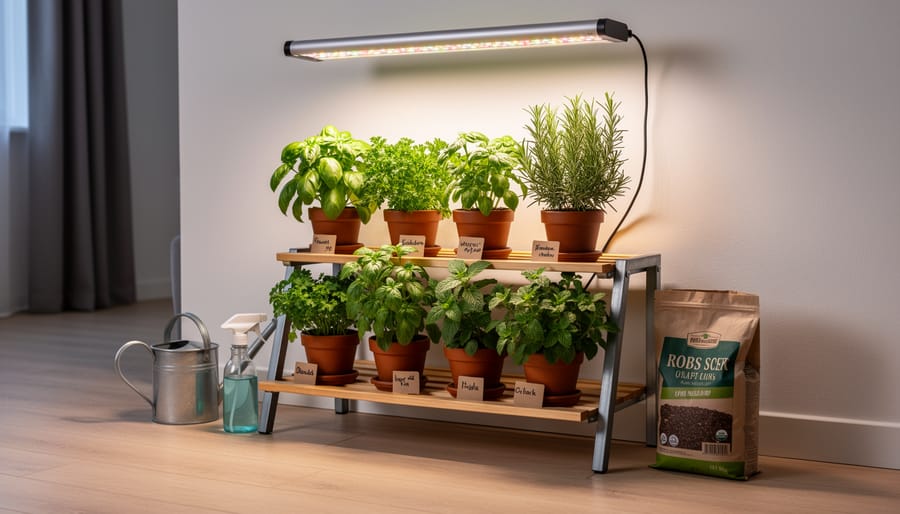
Starting an indoor garden requires just four core categories of supplies: lighting (whether grow lights or smart LED systems), containers with proper drainage, a quality growing medium, and basic watering tools. While the array of products can seem overwhelming in 2026, most beginners can launch their first setup for under $200, with smart garden kits from retailers like Best Buy Canada starting around that price point and complete grow tent systems available through specialized suppliers offering packages that include everything from lights to ventilation.
The real shift I’ve noticed in helping gardeners transition indoors is that technology has made this accessible to everyone. You don’t need a greenhouse or a degree in horticulture anymore. Smart gardens with built-in lighting and automated watering systems handle the guesswork, while modular grow tent kits in sizes from 2×2 feet up to 4×4 feet let you scale your operation to fit an apartment corner or a spare bedroom.
What surprises most new indoor gardeners is discovering which supplies actually matter. After watching countless community members spend money on gadgets they rarely use, I’ve learned that priorities shift depending on what you’re growing. Herbs and leafy greens forgive mediocre lighting far more than fruiting plants like tomatoes or peppers. Succulents laugh off inconsistent watering schedules that would devastate ferns.
The supply landscape has evolved beyond basic pots and soil. Hydroponic systems, pH testers, humidity monitors, carbon filters for ventilation, and specialized nutrients now fill the catalogs of dedicated suppliers across Canada. Some of these tools transform your results. Others collect dust. This guide cuts through the options to help you build a setup that matches your goals, your space, and the plants you actually want to grow.
Understanding What You Really Need (Not Just What’s Marketed)
When I started indoor gardening five years ago, I walked into a hydroponics store with a loose plan and walked out $800 poorer with equipment that didn’t fit my apartment or match my actual growing goals. I’d bought a massive grow tent for a tiny spare bedroom, invested in advanced climate controls for plants that didn’t need them, and purchased enough nutrients to last three years. Most of that gear now lives in my parents’ garage.
That expensive lesson taught me what really matters: honest self-assessment beats slick marketing every time.
Before you click “add to cart” on any indoor gardening supplies, step back and evaluate what your space and goals actually require. Start by asking yourself these fundamental questions:
- How much floor and vertical space can I realistically dedicate to growing?
- What’s my natural light situation, do I have south-facing windows or mostly shade?
- What’s my honest budget, including ongoing costs like electricity and nutrients?
- Which specific plants do I want to grow, herbs, leafy greens, tomatoes, ornamentals?
- How much daily time can I commit to watering, monitoring, and maintenance?
Your answers determine everything else. Growing basil and lettuce on a kitchen counter requires completely different supplies than cultivating year-round tomatoes in a dedicated grow room. A windowsill herb garden might need just quality container gardening basics and a small supplemental grow light, while a full hydroponic setup demands tents, ventilation, specialized lighting, and climate controls.
Distinguish between essential supplies and nice-to-have upgrades. Essentials create the conditions your chosen plants need to survive: appropriate light, adequate containers, proper growing medium, and basic nutrients. Everything else, automated watering systems, fancy pH meters, smart environmental monitors, falls into the upgrade category. Start with essentials that match your specific plants and space, then expand only when you’ve mastered the basics and identified real gaps in your setup. This approach saves money and prevents the garage-full-of-regrets scenario that tripped me up as a beginner.
Essential Indoor Gardening Supplies Compared
Grow Lights: From Basic to Advanced
Choosing a grow light is probably the most important decision you’ll make for your indoor garden. Plants need light to photosynthesize, and without the right spectrum and intensity, even the best seeds and soil won’t deliver results.
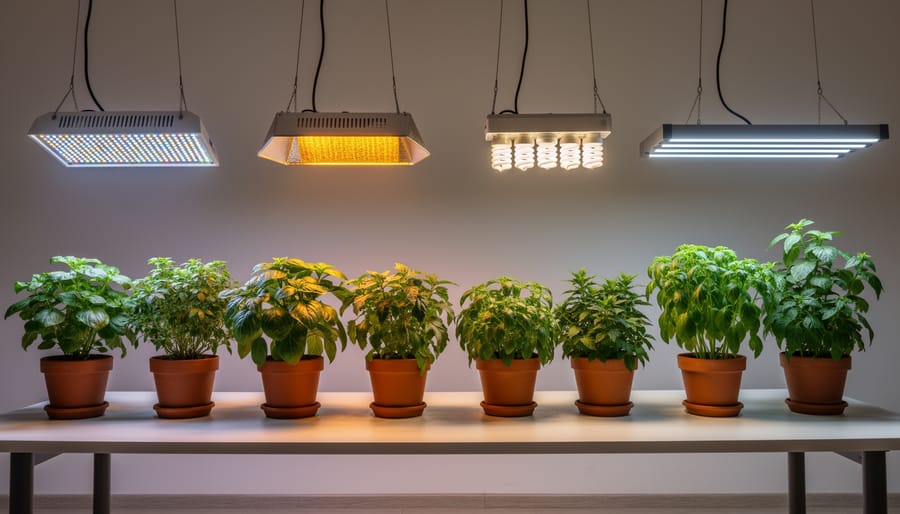
LED grow lights dominate the market in 2026 because they’re energy-efficient, run cooler than older technologies, and offer full-spectrum output that mimics natural sunlight. They work brilliantly for everything from leafy greens to flowering plants. Fluorescent lights, particularly T5 fixtures, still have their place for propagation and low-light plants like herbs, but they lack the intensity needed for fruiting vegetables or cannabis. When shopping, look for lights labeled full-spectrum, which means they provide the blue wavelengths seedlings crave and the red wavelengths that encourage flowering and fruiting.
Light intensity matters as much as spectrum. Small herb gardens on a countertop need far less wattage than a full vegetable setup. For a 2×2 space, a 100-150 watt LED typically suffices. Step up to a 3×3 area and you’re looking at 300-400 watts. A 4×4 setup demands 600-800 watts to properly penetrate the canopy and reach lower leaves.
Match your light to your plants and space dimensions. Basil and lettuce thrive under moderate light, while tomatoes and peppers need high intensity. Check the manufacturer’s coverage area specifications, and remember that hanging height affects both coverage and intensity.
Grow Tents and Enclosed Environments
A good grow tent is like a dedicated studio for your plants, it contains everything they need while keeping the chaos out of the rest of your home. I learned this the hard way after my first winter of indoor growing, when light from my basement setup kept my family awake at night and I couldn’t regulate temperature to save my life.
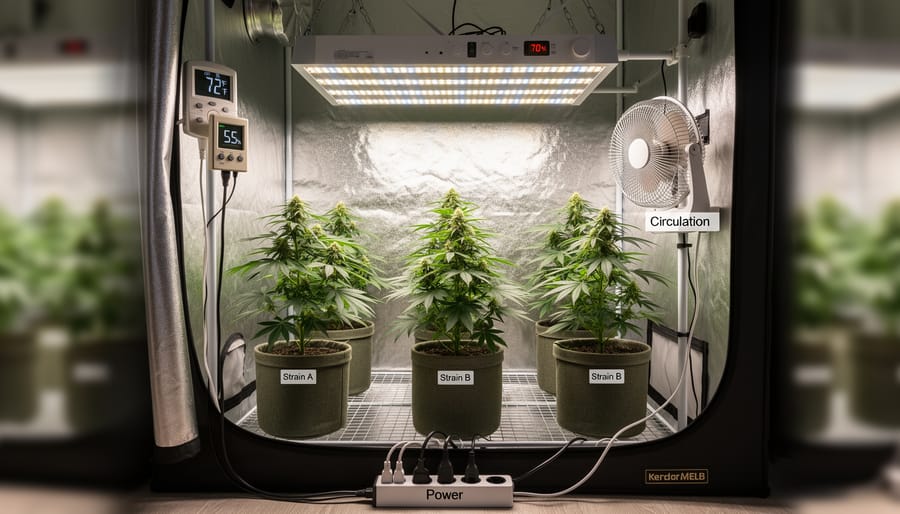
The main advantage of a grow tent is complete environmental control. The reflective interior walls (usually Mylar or similar material) bounce light back onto your plants rather than letting it scatter uselessly around the room, which can increase light efficiency by 30% or more compared to an open setup. Quality tents feature thick, lightproof fabric that prevents any leaks, which matters both for maintaining your plants’ day-night cycles and for not annoying anyone who shares your space.
Size matters more than you might think. A 2x2x4 tent works well for a handful of herbs or a couple of compact plants, it’s genuinely small, fitting easily in a closet. Move up to a 3x3x6 and you’ve got room for four to six medium-sized plants with proper spacing for airflow. The 4x2x5 configuration suits narrow spaces but still provides decent growing area, while a 4x4x6 tent accommodates larger plants or a more ambitious vegetable garden. Think about mature plant size, not just seedlings, when choosing dimensions.
Durability separates cheap tents from investments. Look for heavy-duty zippers that won’t fail after a few months, reinforced stitching at stress points, and sturdy metal frames that don’t bend when you hang lights and fans. The reflective material should be securely attached to the fabric, not peeling after a season. Spending an extra fifty dollars now beats replacing a collapsed tent mid-grow.
Complete Grow Kits vs. Building Your Own System
When I started indoor gardening, I spent weeks researching individual components, triple-checking compatibility between lights and tents and ventilation systems. My friend Sarah, meanwhile, ordered a complete 2x2x4 grow kit and had plants growing three days later while I was still comparing fan specs.
Both approaches work, but they suit different people and situations.
Complete kits solve the compatibility puzzle for you. Current options include 2x2x4, 3x3x6, 4x2x5, and 4x4x6 configurations that package lights, tents, ventilation, and sometimes water pumps for hydroponic systems together. You know everything will work as a unit, which matters more than most beginners realize. The trade-off? You’re locked into whatever quality level and specifications the manufacturer chose. A $146.99 kit might include a perfectly adequate grow light or a mediocre one that you’ll want to upgrade within six months.
Building your own system costs more upfront but gives you control. You can invest in a premium full-spectrum LED while starting with a basic tent, then upgrade housing later. For hydroponic, Dutch bucket, or airponic setups, component selection becomes critical, you’ll want BPA-free, food-grade materials if you’re growing edibles, which not all kit manufacturers prioritize.
Consider kits if you’re testing whether indoor growing suits you or if decision fatigue outweighs the flexibility benefits. Build your own if you have specific plants in mind that need particular light spectrums, if you’re planning to expand your setup, or if you enjoy researching gear. I’ve done both, and honestly, my custom setup performs better but took three times longer to get running.
Growing Medium Options: Soil, Hydroponics, and Beyond
Your growing medium is the foundation that determines your watering routine, nutrient delivery, and overall plant health. I started with potting soil because it felt familiar, but quickly discovered how much the medium choice shapes your entire indoor setup.
Traditional potting soil remains the most beginner-friendly option. It retains moisture, provides some nutrients, and forgives watering mistakes that would kill plants in other media. Herbs, leafy greens, and most ornamental plants thrive in quality potting mixes. The downside? Soil gets heavy, can harbor pests, and limits your ability to precisely control nutrient delivery.
Hydroponic systems flip everything. Plants grow directly in water enriched with nutrients, often supported by inert media like rockwool, clay pebbles, or coconut coir. Rockwool cubes work brilliantly for starting seeds and transplanting into larger hydroponic setups. This approach accelerates growth, sometimes dramatically, because roots access oxygen and nutrients more efficiently. But hydroponics demands attention. You need to monitor pH levels and nutrient concentrations, making systems like those from specialized hydroponic suppliers better suited to growers ready to stay involved.
For plants with heavy feeding requirements (tomatoes, peppers, fruiting crops), hydroponics delivers faster results. For low-maintenance herbs or decorative plants where you prefer simplicity, stick with soil. Your experience level matters more than plant type: soil forgives neglect, while hydroponics rewards precision.
Climate Control Equipment
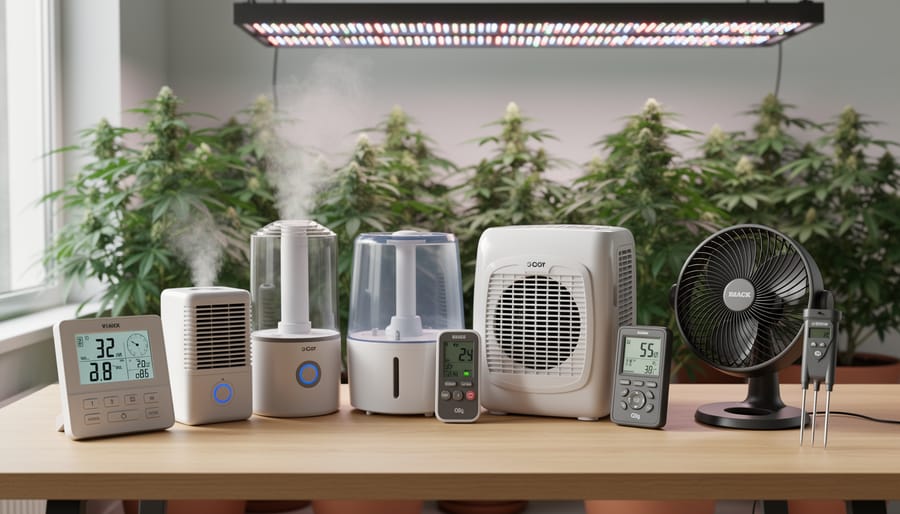
Proper climate control can make or break your indoor garden, regardless of how much you spend on lights or growing medium. Your plants need consistent temperature, humidity, and fresh air circulation to thrive, which means investing in ventilation and monitoring equipment from the start.
For smaller setups, a 4-inch inline fan paired with a matching carbon filter handles air exchange efficiently without overwhelming your space or budget. These compact systems fit perfectly in 2×2 or 3×3 tents, pulling stale air out while controlling odors if you’re growing anything aromatic. The inline fan should run continuously or on a timer to prevent humidity buildup and ensure your plants get adequate CO2.
Environmental monitoring matters just as much as ventilation. Keeping track of temperature, humidity, and soil pH prevents problems before they damage your plants. I learned this the hard way when my first basil crop wilted because I had no idea my grow tent was hitting 85 degrees every afternoon. Now I check conditions daily.
A 3-in-1 soil tester that measures pH, temperature, and humidity gives you essential data without cluttering your setup with multiple devices. These combination meters typically run around $50 to $60 and pay for themselves by helping you catch issues early. Simple analog options work fine if you’re just starting out, though digital meters offer easier reading in dim grow spaces.
Key Buying Factors That Actually Matter
When you’re comparing products and suppliers, a few decision factors separate smart purchases from costly mistakes. Here’s what genuinely matters.
Quality indicators you can actually assess. For electrical components like grow lights and fans, check for certifications (UL, ETL, or CE marks) and look for brands that specify wattage draw, not just equivalents. Tents should use at least 600D canvas and metal corner connectors rather than plastic. Growing media should clearly state whether materials are food-grade if you’re planning edibles. Read reviews focused on longevity, not just initial impressions.
Compatibility saves you from expensive do-overs. Before buying, confirm that components work together: duct sizes for fans and filters (4-inch is common for smaller setups), power requirements that won’t overload your circuit, and tent dimensions that accommodate your chosen light’s coverage area. A 2×2 tent won’t fit a light designed for 4×4 coverage, and mismatched ducting means you’ll need adapters or replacements.
Scalability matters more than you think. If you might expand, choose modular systems over all-in-one units that can’t grow with you. A controller that handles multiple zones beats one locked to a single tent. Adjustable light hangers, additional ducting ports, and ventilation systems with speed controllers let you adapt without starting over. I started with a single 2×2 setup, and within six months I’d added a 3×3, having chosen compatible equipment from the start saved me hundreds in redundant purchases.
Value versus cost isn’t about finding the cheapest option. A $200 LED light that lasts five years with proper spectrum beats a $60 light that burns out in eight months. Calculate cost per growing season, factor in energy consumption (LEDs versus older HID technology), and consider whether free shipping thresholds like $150 make bundling your initial purchase smarter than buying piecemeal. Some specialized hydroponics suppliers offer deeper product ranges and expert support that general retailers can’t match, which matters when you’re troubleshooting compatibility or USDA zones don’t apply to your controlled indoor environment.
Evaluate suppliers on product selection breadth, not just price, one-stop shops simplify compatibility, while niche retailers often stock hard-to-find components and premium brands.
Smart Recommendations for Different Growing Goals
Your goals determine which supplies make sense and where to shop for them. A kitchen herb garden needs different equipment than a year-round vegetable setup, and chasing the wrong products wastes money fast.
For herbs and greens, keep it simple. A 2×2 grow tent with a basic LED panel covers most countertop herbs, basil, cilantro, parsley, without taking over your apartment. I started exactly this way five years ago, and that little 2x2x4 setup still runs in my kitchen. Pair it with a soil-based system rather than jumping straight to hydroponics; you’ll learn plant behavior without fighting pH swings and nutrient ratios. General home improvement stores carry decent starter lights and basic ventilation, though specialized hydroponic retailers offer better tent quality with reflective interiors that don’t degrade after six months.
Growing vegetables year-round demands more space and control. A 3×3 or 4×2 tent gives you room for tomatoes, peppers, and leafy greens simultaneously. You’ll need stronger lighting, full-spectrum LEDs rated for flowering and fruiting, plus reliable climate management. A 4-inch inline fan paired with a carbon filter handles odor and air exchange in these mid-sized setups, preventing the stale, damp conditions that invite mold. This is where specialized suppliers shine: they stock complete grow kits with compatible components and understand the technical questions general retailers can’t answer. Many hydroponic-focused stores also offer free shipping on orders over $150, which offsets the higher per-item costs when you’re building a complete system.
- Beginner herb grower ($200-300): 2x2x4 grow tent kit with basic LED panel, small fan, timer, and soil containers
- Intermediate vegetable gardener ($500-700): 3x3x6 or 4x2x5 complete kit with full-spectrum LED, 4-inch ventilation system, carbon filter, and choice of soil or simple hydroponic reservoir
- Serious indoor farmer ($1000+): 4x4x6 tent with commercial-grade LED, automated climate controls including environmental monitors, Dutch bucket or aeroponic system with BPA-free components, and backup ventilation
Ornamental plants, orchids, ferns, tropical foliage, need gentler conditions than edibles. Lower light intensity works fine, but humidity matters more. Skip the big grow tents and invest in quality environmental monitoring instead; a 3-in-1 tester tracking soil pH, temperature, and humidity helps you dial in the microclimate these plants crave. Decorative options from general retailers actually work better here since aesthetics matter when the setup lives in your main living space.
Advanced hydroponics is its own world. If you’re running rockwool slabs, nutrient dosing systems, or multi-zone reservoirs, shop exclusively with dedicated hydroponic suppliers. They carry food-grade materials, technical nutrients, and replacement parts that big-box stores never stock. Yes, you’ll pay more upfront, but compatibility issues disappear when components come from specialists who understand how the pieces interact.
Common Mistakes to Avoid When Buying Indoor Gardening Supplies
I learned this lesson the hard way during my second year of indoor growing. I was so excited about upgrading that I ordered what I thought was a standard carbon filter online, only to discover it was absolutely massive when it arrived. The thing weighed more than my dog and wouldn’t fit in my grow tent without blocking the entire top vent. I had to return it and pay shipping both ways, which cost me nearly as much as buying the right 4-inch filter in the first place.
That expensive mistake taught me to measure twice and order once, and it’s far from the only pitfall waiting for new indoor gardeners.
The most common error is buying equipment sized for your aspirations rather than your actual space. A friend in our gardening community excitedly purchased a 4x4x6 grow tent for her apartment balcony alcove, then realized she couldn’t access the back half once it was set up. She ended up selling it at a loss and starting over with a 2x2x4 setup that actually fit. Before you click buy, measure your space with a tape measure, not your imagination. Account for door swing, maintenance access, and ventilation clearance.
Skimping on ventilation ranks second on my list of regrets I’ve watched others make. One member spent $200 on a beautiful grow light setup but didn’t budget for proper airflow. Within three weeks, he was battling mold and heat stress. Inline fans and carbon filters aren’t glamorous purchases, but they prevent problems that will cost you far more in lost plants and wasted time.
Component compatibility trips up many first-timers. Mixing brands isn’t inherently bad, but you need to verify that your grow light controller works with your timer, that your tent poles fit your fan clips, and that your hydroponic pump matches your system’s tubing. Read specifications carefully rather than assuming everything is universal.
Energy costs sneak up on people too. Those powerful LED grow lights running twelve to sixteen hours daily will definitely show up on your electricity bill. Calculate the wattage and estimate monthly costs before committing to equipment that might strain your budget long-term.
Frequently Asked Questions About Indoor Gardening Supplies
How much should I expect to spend to start indoor gardening?
A basic windowsill herb setup can cost under $50 with simple containers and basic potting mix, while a complete beginner’s grow tent kit typically runs between $150-$200. As you scale up to larger tents or hydroponic systems, expect to invest $300-$500 for quality equipment that will last multiple growing seasons.
Can I mix and match brands when building my setup?
Yes, most indoor gardening components are designed to work together regardless of brand, especially standard items like grow lights, tents, and ventilation fans. The key is matching specifications like tent pole diameter for clip-on accessories or fan diameter for ducting connections rather than worrying about brand compatibility.
What’s the difference between hydroponic suppliers and regular garden centers?
Specialized hydroponic retailers carry advanced equipment like rockwool growing media, inline ventilation systems, and complete grow kits in specific sizes like 2x2x4 or 4x4x6 configurations that you won’t find at general garden centers. They also offer nutrients formulated specifically for soilless growing and often provide free shipping on orders over $150, though regular garden centers excel at traditional soil-based supplies and may be more convenient for basic needs.
Do I need a complete kit or can I start smaller?
Starting smaller is usually smarter unless you’re certain about your commitment and space. Begin with a few plants under a basic grow light to learn the fundamentals, then upgrade to a complete system once you understand your actual needs and which plants you enjoy growing most.
How do I know if equipment will fit my space?
Measure your available area carefully, remembering that you’ll need clearance around tents for air circulation and access to zippers, plus overhead space for hanging lights at the proper distance from plants. A 2x2x4 tent fits tight spaces but limits what you can grow, while 3x3x6 or 4x4x6 options need dedicated room space but offer much more flexibility for expansion.
Do nutrients and growing additives really matter?
Quality nutrients make a noticeable difference in plant health and yield, especially for edibles like vegetables and herbs where you want robust growth. While basic potting soil contains some nutrients, plants in containers deplete them quickly, and hydroponic systems require complete nutrient solutions since there’s no soil at all to provide minerals.
One question I hear constantly from readers with young children: are indoor gardens safe around kids? The short answer is mostly yes with a few precautions. Keep liquid nutrients and pH adjusters locked away just like any household chemical, ensure grow lights are positioned where curious hands can’t reach them, and avoid sharp tools lying around your growing area. If you’re planning outdoor gardening too, check out our guide on creating a baby-safe garden for more comprehensive safety tips. The beauty of indoor setups is that you actually have more control over access than outdoor beds, making it easier to create boundaries while still letting kids enjoy watching plants grow.
Here’s the truth I’ve learned after years of helping gardeners set up their indoor spaces: you don’t need every piece of equipment that catches your eye. Start with the essentials that match your actual growing goals, then expand as you gain confidence and understand what your plants truly need. A simple grow light, quality growing medium, and basic climate monitoring will take you further than an expensive complete system you don’t fully understand.
The beauty of indoor gardening is that it scales with you. My first setup fit on a kitchen counter with a single fluorescent bulb and some recycled containers. Now I run a dedicated grow tent, but I got there gradually, learning what worked and what was just clever marketing. Your journey will look different, and that’s exactly how it should be.
I’d love to hear about your indoor gardening supply experiences. What equipment has been worth every penny for you? What purchases do you wish you could take back? Drop your recommendations and hard-won lessons in the comments below. We’re all learning together, and your insights might save someone from making an expensive mistake or help them discover the perfect solution for their space.
With thoughtful choices and the right tools for your situation, you can grow fresh herbs, vibrant greens, and beautiful plants year-round, regardless of what’s happening outside your windows. That’s the real magic of indoor gardening.